Views: 0 Author: D and D Hardware Publish Time: 2025-06-24 Origin: D and D Hardware


Introducing invisible door hinges to your home can instantly elevate the aesthetics of your space. Known for their sleek, seamless design, invisible door hinges are a favorite among interior designers for a modern, minimalist look. Plus, they’re perfect for creating hidden doors or maintaining a polished appearance in any room.
This walkthrough will guide you through the process of installing invisible door hinges, even if you're a first-timer. By the end, you'll have the confidence to tackle this project and upgrade your home’s design.
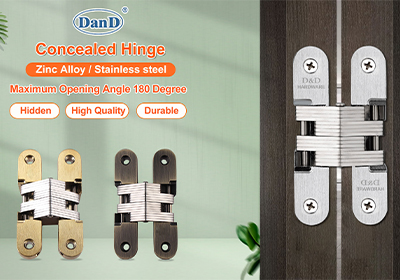
Invisible door hinges, also known as concealed or hidden hinges, are hinges that remain hidden when the door is closed. Unlike traditional hinges, which protrude and are visible from the outside, invisible hinges are recessed into the door and frame, providing a clean, streamlined look.
They’re often used in:
● Modern residential designs,
● Hidden or secret doors,
● High-end commercial spaces.
Before getting started, gather the necessary tools to ensure a smooth installation process:
● Drill
● Wood chisel
● Measuring tape
● Pencil
● Screwdriver
● Level
● Mortising jig (optional, but makes the process easier)
● Invisible Door Hinges set
Before we jump into the installation process, here’s why you should consider this upgrade:
● Clean Aesthetic: Invisible hinges blend into your door, ensuring a sleek appearance.
● Hidden Functionality: These hinges are great for creating secret or hidden doors.
● Smooth Operation: High-quality invisible hinges provide silent and smooth opening/closing.

To begin:
1.Determine Hinge Placement: Typically, you’ll need three hinges for tall doors (two-thirds up, one-third up, and one in the middle), and two for smaller doors (top and bottom).
2.Mark the Positions: Use a measuring tape and pencil to mark where the hinges will sit on the door's edge and the frame.
Pro Tip : Be precise! Proper alignment ensures the door operates smoothly.
Invisible hinges need to be recessed into the door and frame. Here’s how to do it:
1.Use a Mortising Jig (Recommended Method): A mortising jig makes the process faster and ensures accurate recesses. Align the jig with your marked points and use a drill to carve out the hinge slots.
2.Chisel Manually (Alternative): If you don’t have a mortising jig, use a chisel and hammer to carefully carve the recess. Take your time to ensure precision.
The depth of the recess should match the thickness of the hinge to ensure it sits flush.
Once you’ve created the recess, place the hinge into the slot and mark where the screw holes need to go. Remove the hinge and drill pilot holes. This prevents the wood from splitting when you insert the screws.
Now, attach the hinges to the door:
1.Place the hinge into the recess you’ve created on the door edge.
2.Secure it with screws using a screwdriver, aligning it carefully.
Once hinges are installed on the door:
1.Align the door with the frame slots you’ve created for the hinges.
2.Secure the hinge to the frame with screws.
3.Use the level to ensure the door is straight and adjust as needed.
Open and close the door several times to check for smooth operation. If the door sticks or doesn’t align correctly:
● Check and adjust the alignment of the hinges.
● Ensure the recess depth is even for proper hinge movement.
To extend the life of your hinges:
● Regularly clean them to prevent dust build-up.
● Lubricate occasionally for smoother movement.
● Check periodically for loose screws and tighten as needed.
Installing invisible door hinges is an effective way to modernize the look of your doors while adding functionality and style. With careful measurements, the right tools, and a touch of patience, this DIY project is something you can easily take on.
If you're ready to enhance your space further, explore our curated selection of high-quality invisible door hinges designed for durability and smooth performance.
For further information about concealed door hinges or any of our services, please click to Contact us Now:
Contact: David Jian
Mobile No.: 0086-139 2903 7292
Email: sales@danddhardware.com