Views: 0 Author: Site Editor Publish Time: 2025-12-09 Origin: Site


Security is often about the little things. While alarm systems and heavy-duty deadbolts get most of the attention, the humble door viewer (commonly known as a peephole) is your first line of defense against unwanted visitors. It allows you to verify identity without unlocking your home, maintaining that crucial physical barrier between you and the outside world.
However, older viewers often become scratched, cloudy, or painted over, rendering them useless. Or perhaps you simply want to upgrade from a standard lens to a wide-angle version for better visibility. Regardless of the reason, replacing a door viewer is one of the easiest and most effective DIY projects you can undertake. It requires minimal tools, very little time, and offers an immediate improvement to your home security.
This guide walks you through every step of the process, from removing the old hardware to selecting and installing a crisp, new lens.
You might not give that small circle of glass in your door much thought until you actually need it. If you have to squint to see through it, or if the image is distorted and dark, it is failing at its primary job.
Over time, moisture can get trapped inside the barrels of older units, causing condensation that fogs up the glass. Many older models also have plastic lenses rather than glass, making them susceptible to scratching from cleaning or keys. Furthermore, standard builders-grade viewers often have a narrow field of view. This means someone can stand just out of frame, hiding from your sight.
Upgrading to a modern door viewer solves these issues. You can opt for a model with a 200-degree field of view, ensuring you can see the floor (to check for packages) and the sides of the door frame. You might even consider a privacy shutter, which prevents people outside from using a reverse peephole viewer to look inside your home.
Before you start unscrewing hardware, gather the necessary supplies. The beauty of this task is that it requires very few specialized tools.
Flathead Screwdriver: A wide-bladed screwdriver is ideal. In a pinch, a large coin (like a quarter or a nickel) often works better because it fits perfectly into the wide slots of the viewer barrel without slipping.
Tape Measure or Caliper: Essential for ensuring your new viewer fits the existing hole.
Utility Knife (Optional): Useful if the old viewer has been painted over.
The New Door Viewer: We will discuss how to choose the right one in the next section.
Silicone Sealant (Optional): For exterior doors exposed to heavy rain, a tiny bead of sealant can prevent moisture ingress.
1
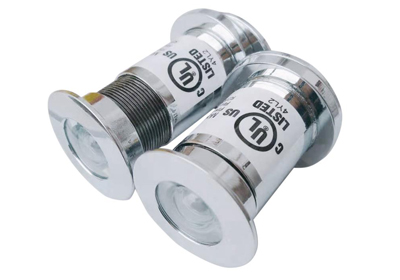
Most door viewers consist of two parts: an exterior barrel (the lens you look into from outside) and an interior barrel (the viewing piece inside the house). They screw into each other through the thickness of the door.
To remove the old unit, stand inside your home. Locate the two small slots on the face of the viewer. Insert your wide flathead screwdriver or coin into these slots. Apply firm pressure and turn counter-clockwise.
If the viewer spins but doesn't unscrew, you may need a helper to hold the exterior lens still while you turn the inside piece. If the viewer is stuck fast, it is likely painted shut. Take your utility knife and carefully score the paint around the edge of the flange on the inside of the door. This breaks the seal and should allow the barrel to turn freely.
Once the threads disengage, pull the interior barrel out. Then, move to the outside and pull the exterior barrel out.
Do not throw the old hardware away immediately. You need it to measure for your replacement. If you buy the wrong size, you will end up with a viewer that rattles loosely in the hole or one that is too thick for your door.
Insert your tape measure or a caliper into the hole in the door. Standard bore sizes are usually 1/2 inch (12mm) or 9/16 inch (14mm). However, some newer digital viewers or heavy-duty optical viewers require larger holes. You want a replacement that fits snugly. If your new viewer is too small, it will wiggle; if it is too big, you will have to drill the door, which turns a 5-minute job into a 30-minute job.
Doors come in varying thicknesses. Standard interior doors are usually thinner than heavy exterior security doors. Most door viewers are adjustable within a certain range (e.g., 1-3/8" to 2-1/6"), but you need to confirm your door falls within that range. Measure the edge of your door from the inside face to the outside face.
With your measurements in hand, you can select a replacement. Here are the main factors to consider:
Field of View: Look for a viewer with at least a 160-degree angle. A 200-degree angle is superior, offering a "fisheye" view that reveals much more of your porch or hallway.
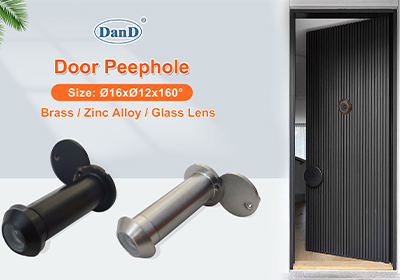
Material: Solid brass housing with glass lenses offers the best durability and clarity. Avoid cheap plastic versions if possible.
Finish: Match the finish to your existing door hardware (doorknob, deadbolt, kickplate). Common finishes include satin nickel, oil-rubbed bronze, and polished brass.
Digital Options: If you struggle with eyesight, a digital door viewer might be the solution. These replace the interior eyepiece with an LCD screen, displaying a large, clear image of who is outside. Note that these are more expensive and require batteries.
1
Installing the new unit is essentially the reverse of the removal process.
Clean the Area: Wipe down the area around the hole on both sides of the door to remove old paint chips, dust, or grime.
Insert the Exterior Barrel: Take the piece with the lens (the objective lens) and insert it into the hole from the outside. Make sure the lens is facing outward.
Insert the Interior Barrel: From the inside, slide the eyepiece barrel into the hole.
Engage the Threads: Gently push the two pieces together until they touch. Begin rotating the interior barrel clockwise by hand. You should feel the threads catch. If you encounter resistance immediately, stop and back it out to avoid cross-threading.
Tighten: Continue screwing the pieces together by hand until they are flush against the door surface.
Secure the Unit: Use your screwdriver or coin to give the interior barrel a final tightening turn. Do not over-tighten! Cranking it too hard can crack the glass lens or strip the threads. It just needs to be snug enough that it won't rotate on its own.

If you bought a high-security or digital viewer that requires a larger bore, you will need to enlarge the hole. The safest way to do this without damaging the door veneer is to clamp a piece of scrap wood over the existing hole and drill through both the wood and the door with the correct size spade bit or hole saw. The wood acts as a guide to keep the drill steady.
If the new viewer is slightly smaller than the hole and rattles, you can wrap a few layers of electrical tape or Teflon tape around the barrel before inserting it. This increases the diameter slightly and creates a snugger fit.
Yes, door viewers work on wood, fiberglass, and steel doors. The installation process is identical. However, if you need to drill a new hole in a steel door, you will need a drill bit specifically designed for metal.
The standard height is usually around 57 to 60 inches from the floor, which accommodates the average adult. However, consider the occupants of the home. If you have children or family members who use wheelchairs, you might consider installing a second viewer at a lower height (around 48 inches) to ensure accessibility for everyone.
To maintain clarity, clean the glass lenses periodically. Do not use harsh abrasives or paper towels, which can scratch the glass. Instead, use a soft microfiber cloth and a mild glass cleaner. Spray the cloth, not the lens directly, to prevent liquid from seeping behind the glass.
Replacing a door viewer is a small project with a significant payoff. It restores your ability to clearly identify visitors and enhances the overall look of your entryway. Whether you choose a classic brass optical viewer or a high-tech digital screen, the key is ensuring the device fits properly and provides a clear, wide view.
By following these steps, you can complete this upgrade in under fifteen minutes. It’s a simple reminder that home security doesn't always require expensive gadgets or monthly subscriptions—sometimes, it just takes a clear view of the other side of the door.