Views: 0 Author: Site Editor Publish Time: 2025-11-22 Origin: Site


Self-closing door hinges are a simple but effective convenience in any home. They ensure doors shut quietly and securely, keeping rooms private, temperatures stable, and pets contained. But what happens when the door slams shut too quickly or doesn't close all the way? The good news is you don't need to call a professional. Most of the time, the solution is a simple adjustment to the hinge's tension.
Adjusting self-closing door hinges might seem like a complicated task reserved for handymen, but it's a straightforward DIY project that almost anyone can handle. With just a couple of basic tools and a few minutes of your time, you can get your doors closing perfectly again.
This guide will walk you through everything you need to know about how these hinges work and provide clear, step-by-step instructions for adjusting their tension. You'll learn how to identify the type of hinge you have, what tools you'll need, and how to safely increase or decrease the closing force.
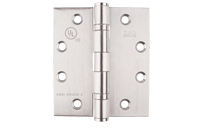
Before you start making adjustments, it’s helpful to understand what you’re working with. A self-closing door hinge, also known as a spring-loaded hinge, contains an internal spring mechanism. This spring stores energy when the door is opened and then releases that energy to automatically pull the door closed.
The tension of this internal spring determines how forcefully and quickly the door shuts. Too much tension, and the door will slam. Too little, and it may not latch properly or even close at all. Most modern self-closing hinges are designed to be adjustable, allowing you to fine-tune this tension to get the perfect closing speed. You'll typically find these on the door leading from your garage into your house, as building codes often require a self-closing, fire-rated door in this location.
Not all hinges on a door with this feature will be spring-loaded. Often, only the middle hinge is a self-closing one, working in tandem with two standard hinges. In some cases, all three hinges might be self-closing to support a heavier door.
The tools required for this project are simple and you likely already have them in your home toolkit. The specific tool for adjusting the tension depends on the hinge's design.
Here’s what you might need:
· Hex Key (Allen Wrench): This is the most common tool used for modern self-closing hinges. The hinge will have a small hexagonal hole at the top or bottom for the key to fit into.
· Adjustment Rod or Pin: Some hinges come with a small metal rod, which looks like a tiny lever. This rod is used to turn the tension mechanism. If you've lost the original rod, a small nail or a sturdy paperclip can sometimes work as a substitute.
· Locking Pin: This is a very small pin, often included with the hinge, that is used to lock the tension setting in place. It’s crucial not to lose this piece during the adjustment process.
· Safety Goggles: It's always a good idea to protect your eyes when working with tensioned springs.
· Screwdriver: In rare cases, some older hinge models may require a flathead or Phillips screwdriver for adjustments.

Ready to get started? Follow these steps carefully to adjust the tension on your self-closing door hinges without any hassle.
First, locate the adjustment mechanism on your hinge. Close the door and examine the hinges. Look for a small hole at the top of the hinge barrel. This is where you will insert your tool. On most models, you'll also see a series of smaller holes around the barrel—these are the tension setting holes where the locking pin goes.
If you don’t see an adjustment point on the top, check the bottom. The location can vary by brand, but it's almost always at one end of the hinge barrel.
If there is already a locking pin in place, you’ll need to remove it before you can adjust the tension. To do this, insert your hex key or adjustment rod into the central adjustment hole.
Apply slight pressure by turning the tool clockwise (to increase tension) just enough to release the pressure from the locking pin. While holding the tool in place, use your other hand to pull the locking pin out. Be careful, as the spring is under tension. Once the pin is out, slowly allow the tool to rotate back counter-clockwise to release the current tension.
Now you can set the new tension. With the locking pin removed, insert your hex key or adjustment rod back into the central hole.
· To Increase Tension (for a faster, stronger close): Turn the tool clockwise. As you turn, you will feel the spring getting tighter. Each small rotation will align the central hole with one of the surrounding locking pin holes. The further you turn, the more tension you add.
· To Decrease Tension (for a slower, softer close): Turn the tool counter-clockwise. If the door is slamming, you'll want to reduce the tension. If it's already very loose, you may need to increase tension from the lowest setting.
A good rule of thumb is to adjust in small increments. Turn the mechanism just enough to line up with the next available hole.
Once you’ve turned the adjustment tool to your desired tension level, you need to lock it in place. While holding the tool firmly to maintain the tension, re-insert the locking pin into the nearest open hole. Make sure the pin is seated securely.
After the pin is in place, you can slowly release the pressure on the hex key or adjustment rod and remove it. The hinge is now set to the new tension level.
Open and close the door a few times to test the new setting. Does it close completely and latch securely without slamming?
· If it still doesn't close fully, you need to increase the tension. Repeat the steps above, moving the pin to the next hole by turning the mechanism further clockwise.
· If the door is now slamming shut, you've added too much tension. Repeat the process, but this time select a hole that is less rotated.
Continue this trial-and-error process until you find the perfect closing speed for your door.
If your door has more than one self-closing hinge, it’s best to set them to the same tension level. This ensures they work together smoothly and prevents uneven wear on the mechanisms. Adjust each hinge one at a time using the same process.
That’s all there is to it. By following these simple steps, you can easily adjust your self-closing door hinges to get them working exactly how you want. No more slamming doors or doors that refuse to close—just the quiet, reliable convenience they were designed for. This quick fix saves you the cost of a handyman and gives you the satisfaction of a DIY job well done.
If you find that your hinge is no longer holding tension no matter how much you adjust it, the internal spring may be broken. In this case, the hinge will need to be replaced. Fortunately, replacing a single hinge is also a manageable project for most homeowners.