Views: 0 Author: D&D Hardware Publish Time: 2025-07-01 Origin: D&D HARDWARE


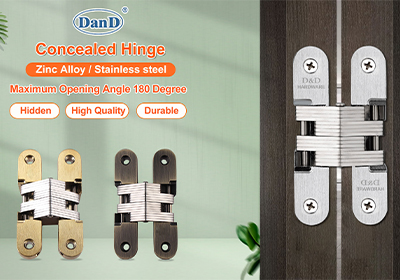
Invisible hinges, also known as concealed hinges, are a sleek and modern solution for doors that need to blend seamlessly with their surroundings. They’re hidden from view when the door is closed, creating a smooth and uninterrupted surface. If you’re ready to upgrade your doors, learning how to properly install invisible hinges is key to achieving that flawless, minimalist look.
This guide will walk you through the step-by-step process of installing invisible hinges on a standard door, ensuring a professional and functional finish.

Invisible hinges are concealed mechanical hinges installed inside the door and frame, making them invisible from the outside when the door is closed. These hinges are often used in high-end architecture or for interior design projects that emphasize clean lines and minimalist aesthetics. Unlike traditional hinges, they provide a seamless appearance without the bulk of visible hardware.


There are several advantages to using invisible hinges over traditional hardware:
● Sleek Appearance: Invisible hinges create a clean, uninterrupted surface with no visible hardware.
● Enhanced Aesthetics: Perfect for modern or minimalist designs, these hinges complement flush doors seamlessly.
● Improved Security: Hidden from view, invisible hinges make it harder to tamper with or remove the door.
● Smooth Functionality: Many concealed hinges offer smoother opening and closing mechanisms compared to visible ones.
Before you start installing invisible hinges, gather the following tools and materials:
● Measurement tape
● Pencil or marker
● Drill and drill bits
● Router
● Chisel
● Wood screws
● Screwdriver
● Invisible hinges (chosen for your door size and material)
● Safety goggles (recommended)
Pro Tip: Double-check the hinge manufacturer’s instructions for any additional tools required specific to the model you’ve purchased.
Follow these steps to install invisible hinges on your door like a pro:
● Locate the hinge positions on both the door and the frame. Most doors require at least two hinges, but heavier or larger doors may need three or more.
● Mark hinge positions 6–8 inches from the top and bottom edges of the door, with equal spacing for additional hinges.
● Use a pencil or marker to ensure precise alignment.
● Place the invisible hinge against your marked position on the door.
● Using a pencil, trace around the hinge to create an outline for the cut-out area.
● Repeat this process for each hinge on both the door and the frame.
● Route or chisel the hinge recesses into the door and the frame. This step is critical for ensuring that the hinge sits flush with the surface.
● Use a router with the appropriate bit for precise and clean cut-outs.
● If a router isn’t available, carefully chisel out the marked area to the exact depth of the hinge thickness.
Pro Tip: Test fit the hinge into the recess periodically as you work to ensure the perfect fit.
● Once the hinges fit snugly in the recesses, mark the screw holes using the hinge as a guide.
● Pre-drill the marked holes to prevent the wood from splitting when inserting screws.
● Secure the invisible hinges to the door using the screws provided.
● Tighten the screws firmly, but avoid over-tightening, which could damage the hinge or the door.
● Align the door with the frame, ensuring the hinges on the door match the recesses on the frame.
● Secure the hinges to the frame with screws, ensuring everything is aligned precisely.
● Check for smooth movement by opening and closing the door gently.
Pro Tip: Use a second set of hands for this step if the door is heavy or difficult to position alone.
● Many invisible hinges have built-in adjusting screws for fine-tuning the alignment. Use this feature to ensure that the door closes evenly and fits flush within the frame.
● Test the door by opening and closing it several times, checking for smooth operation and proper alignment.
● Incorrect Measurements: Always measure twice before cutting to avoid misaligned hinges.
● Over-Chiseling: Excessive chisel work can create loose hinges, compromising stability.
● Skipping Pre-Drilling: Drilling pilot holes is essential to prevent wood from splitting when inserting screws.
● Ignoring Door Weight: Make sure to choose hinges rated for the weight of your door to ensure functionality and durability.
● Opt for high-quality invisible hinges to ensure durability and smooth operation.
● Consider painting or finishing the door after installation for a polished look.
● If you’re installing multiple doors, create a template for consistent hinge placement across all doors.

Invisible hinges provide a modern aesthetic while offering practical advantages like enhanced security and smoother door operation. Whether you’re upgrading a single door or renovating an entire home, these small details can make a big impact on the overall look and feel of your space.
With the right tools, careful planning, and attention to detail, installing invisible hinges is a task that can greatly enhance your doors’ appearance and functionality. By following this step-by-step guide, you can achieve a clean, professional result.
If you’re still unsure about the installation process or need help selecting the right type of invisible hinge, don’t hesitate to contact a professional. A well-installed invisible hinge is not only a design statement but also a key component for long-lasting, reliable door performance.
For further information about invisible door hinge or door hardware, click here.
Contact: David Jian
Mob:0086-139 2903 7292
Email: sales@danddhardware.com